
Related Articles

In case you missed reading my earlier blog posts, let me tell you that I’ve bought myself a Raspberry Pi 4. The reason I got it was to spend time exploring the various use cases I could do on a Raspberry Pi. Since I had worked on the Arduino Uno way back in college, I had some idea as to how things work with these single board computers. Apart from just tinkering on my Raspberry Pi 4, I’m also learning some basics in Python too. I’m that sort of a developer who learns by doing and focuses mostly on what is needed to get the job done.
Ever since I got my Raspberry Pi, I’ve been exploring it and experimenting with a lot of Raspberry Pi projects. And what better than creating my first Raspberry Pi project that connects both the physical and digital world. In this post, I talk about my first Raspberry Pi project – Push to Tweet.

My First Raspberry Pi Project – Push to Tweet
The name of my first Raspberry Pi project gives away everything! As it says, I wanted to develop a project where-in I could tweet by just pressing a physical button. So just like you ring a doorbell, or turn on an appliance, my first Raspberry Pi project would push a tweet at the press of a button. I found the use case interesting and fun at the same time. I got to learn about integrating Twitter APIs with Python libraries to share a tweet. I also got to learn to use a physical button with my Raspberry Pi and read its status and perform an action accordingly.
Before I dig into my first Raspberry Pi project, there are a few things that you’d need:
- Raspberry Pi with Raspbian (or any other OS) with Python
- Push Button Switch – Amazon
- Breadboard & Jumper Wires – Amazon
Push to Tweet – Setup
I’ll break the whole project into two parts to make things simpler:
- Hardware setup
- Actual Code
Hardware Setup
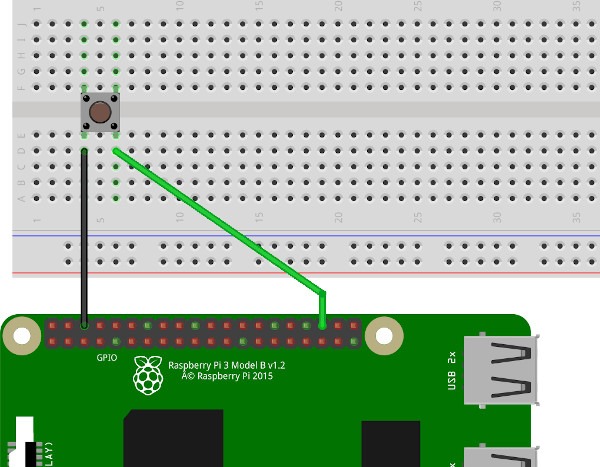
The first step is to set up the hardware in order to use the push button. You need to take a breadboard and place the push button switch on it. As for the electrical connection, you need to connect any of the GPIO pins to one part of the push button switch and connect the ground GPIO pin to the other. You can refer to the below diagram to understand more about the hardware setup for the push to tweet. Refer to the Raspberry Pi 4 GPIO diagram here and note the GPIO pin you are attaching the switch to.
It’s a good practice to always use a resistor in your circuit to avoid any damage to the component or the Raspberry Pi 4 board due to electrical current. However, since this was a one-off project, I decided to use it without a resistor.
Actual Code
Now that we have the hardware ready for the Push To Tweet project, we shift our focus to the software bit of it. We would be using Python to get things done. So we would be doing 3 things:
- Creating a Twitter App
- Reading the state of the push button
- Sending a Tweet
To accomplish this, I used the popular Twython library. The instructions to install the library are mentioned here.
Step1: Create a Twitter Developer Account if you don’t have one here.
Step2: Create a new Twitter App from the Developer Account. When you create an app, you need to provide 3 things:
- Name: Name of your App
- Description: Description of the App
- URL: Website (you can give google.com in case you don’t have a website)
Once you create the Twitter App, it will ask you to create access tokens Access tokens are a popular way to allow secured access to any service. It will now provide you with 4 things: Consumer Secret, Consumer Key, Access Token, and Access Token Secret. Copy and keep these ready as you will need them later.
Once you have these things ready, all you need to do is create a file called auth.py and enter the following code and save it.
consumer_key = '<your consumer key>'
consumer_secret = '<your consumer secret>'
access_token ='<your access token>'
access_token_secret ='<your access token secret>'
Open a new file and import the following three libraries:
- GPIO – to access GPIO pins
- Twython – to connect with Twitter
- Auth – to fetch the authentication details
from gpiozero import Button
from twython import Twython
from auth import(
    consumer_key,
    consumer_secret,
    access_token,
    access_token_secret
    )

twitter = Twython(
    consumer_key,
    consumer_secret,
    access_token,
    access_token_secret
    )
We now need to tell Raspberry Pi where is the switch button connected so that it can read the status. To do that you need to create a button variable and mention the GPIO pin to which it is connected to.
button = Button(2) #2 is pin where the switch is attachedNow we need to tell the Raspberry Pi to wait for the button to be pressed. For this, there is an inbuilt method wait_for_press(). So in the next line write the following:
button.wait_for_press()After this, the Raspberry Pi will know where the push button is attached and is also able to read the press status of the push button. We now need to just create our tweet and send it. For that create a variable to store your message.
message = 'This is my push to tweet project via #RaspberryPi'To send the tweet, use the update_status method
twitter.update_status(status=message)And that’s it. Save and run the program. If it is built without any error, you can go ahead to test the push to tweet feature. Press the switch and check your Twitter profile – you will see this message posted as a tweet!
Congratulations, you’ve successfully implemented your first Raspberry Pi Push to Tweet project. I’m sure you liked it!
Full Push to Tweet Code
Below is how the final code will look
from gpiozero import Button
from twython import Twython
from auth import(
    consumer_key,
    consumer_secret,
    access_token,
    access_token_secret
    )

twitter = Twython(
    consumer_key,
    consumer_secret,
    access_token,
    access_token_secret
    )

button = Button(2)
button.wait_for_press()
message = 'This is my push to tweet project via #RaspberryPi'
twitter.update_status(status=message)
Above is a simple code that you can directly use. You can also pull it from GitHub. The one that I’ve used is using an API to tweet a random Quote Of the Day. Below is a video of the setup.
If you observed a sudden barrage of quotations from my handle, don’t worry it was my first small @Raspberry_Pi project – Push To Tweet.#RaspberryPi #IoT #Socialmaharaj #NewProject
— Atulmaharaj (@Atulmaharaj) December 21, 2020
Here’s a demo 👇🏼 https://t.co/PQAdX1TL43 pic.twitter.com/ytpf1nNPqo
Push To Tweet 2.0
Once you have successfully implemented Push To Tweet, you can take it to the next level. The problem with the current project is that it will always tweet the same message everything, you don’t want that. So there are a few things that you can do to take your Push to Tweet first Raspberry Pi project to the next level.
- Create a list of strings: You can create a list with random strings and use a random method to randomly pick a string from the list and tweet it. That way every time you push the button, you will have a different tweet.
- Use APIs for facts & Quote: You can take it up a notch and leverage free APIs that give you a random fact or quote. So with the press of every button, it will call the API, get a random fact, and tweet it. This was you are guaranteed of a new tweet every time you push to tweet.
- Use Sensors, Cameras: Lastly, to make it a bit more complex, you can hook a Raspberry Pi camera along with a temperature sensor. So whenever a button is pressed, the camera takes a photo, along with the current temperature reading, and posts a tweet. This tweet will have a photo captured by the camera along with the temperature.
That’s about it for your first Raspberry Pi project. Wasn’t that fun? Let me know how you liked it and whether you want to see more such projects in the future. If you’ve done this, do share your thoughts in the comments below, tweet me at @Atulmaharaj, DM on Instagram or Get in touch.


You are reviewing gadgets as well.. Its great
Yes, thank you so much 🙂
That’s so cool, like ring a bell to tweet 🙂 While reading this post, I went back to may software days 🙂 So exciting to see projects work
Hehehe…Thanks so much 🙂
This was very interesting. I would love to learn more about this Atul.Fun project ,I must say!
Thanks a lot Amritaji, I love to spend time creating such projects.