
Related Articles

In my previous post I mentioned that I had purchased a WD Green 240GB SSD. Along with that I also mentioned the benefits of SSD over HDD and why you should also switch. If you use your SSD with a traditional hard disk, there are is one major thing that you need to ensure. You need to make sure that your Windows is sitting on the SSD and not on the hard disk. One reason of moving to SSD is speed and if Windows 10 is sitting on the hard disk, you’ll not experience the speed difference. Thus it is very important to ensure that you move Windows 10 to SSD along with any other software that you use regularly. This will make things faster and you will definitely feel a difference when using your desktop. In this post I’ll be talking about the steps that I followed for moving Windows 10 to SSD from HDD.

Moving Windows 10 to SSD from HDD
Before you Begin
The thumb rule to follow whenever you are using any device with memory is to take a backup. Because if anything goes wrong in the process, you’ll lose a lot. Hence to prevent that it is recommended to take a backup. In my case I backed up all the important files I had on my external HDD. Now, the hard disk that I have is of 500 Gb while the new SSD is just 240GB. So how to move windows 10 to SSD with lower capacity ? To achieve this we need to clone the entire C drive to the SSD.
Note: Simply copy pasting your windows folder or the C drive doesn’t work. This because your there are some boot settings that need to done in the process. This doesn’t happen when you are copy pasting the folder. Thus you need to clone the entire C drive that will copy these settings too.
The Cloning Process – Move Windows 10 to SSD
For this, there are a few tools that you need to use. The one that I used is the EaseUS Todo Backup Tool. This is a paid tool, but the 30 day free trial does ‘some part’ of the job. The EaseUS Backup Tool trial version doesn’t allow you to create partitions. For that I used the default Disk Management tool that is provided with Windows 10. Below are the steps you should follow to move windows 10 to SSD from HDD
- Take a backup of all the files you need. You can remove the user data – pictures, videos, music etc stored on your C drive and ensure that the entire C drive size is less than your SSD size
- Open EaseUS ToDo Backup Tool. Click on the Clone Disk option
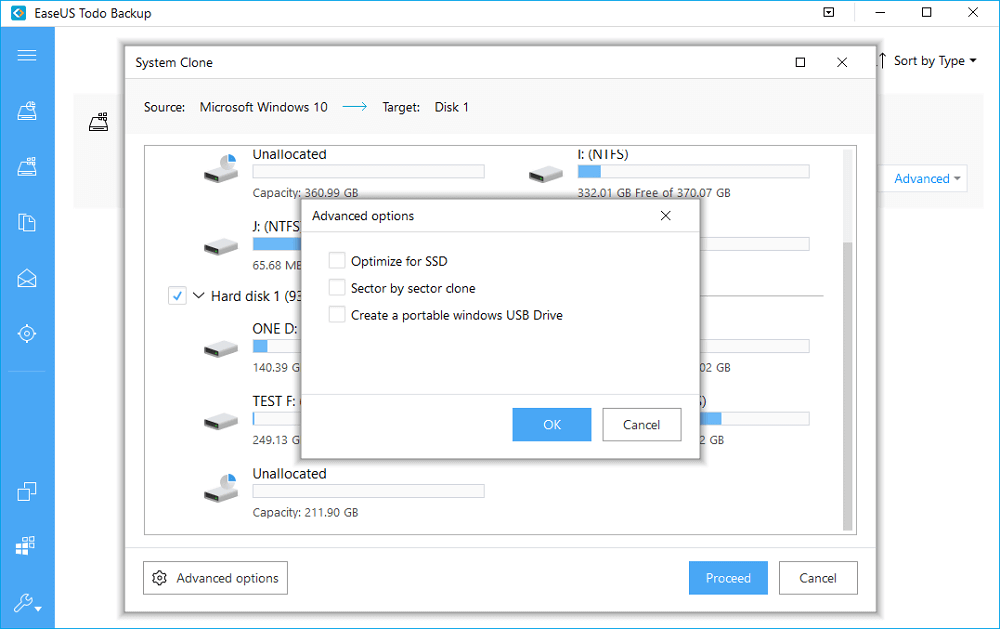
- If will show an option of what disk to clone. Choose the C drive and check the box that says “Optimize for SSD” and hit OK
- The entire process will take about 15-20 mins to clone the C drive. This entirely depends on the size of your partition. In my case it was about 116 GB
- Once this is done, you will see a new partition under My Computer which will be an exact clone of your C drive. At this point the computer still doesn’t know that you have a clone of C drive and it will still boot from the hard disk
- You can restart the machine and press DEL key to get into the BIOS menu. Here you need to change the boot disk priority. Move the SSD to position 1. Save settings and restart. At first restart you might receive a BSOD error about some missing file. You can restart the machine and it disappears
- Congratulations, you have successfully moved windows 10 to SSD from HDD. Mention in the comments below if you experienced faster boot time !
Free Up Space
At this point you have two replicas of the same partition and I’m sure you don’t want it. This work is very easy with EaseUS Partition Manager but unfortunately the free version doesn’t allow it. For this you can use the built in Disk Management tool. You can follow the below steps to delete the partition and free up space.
- Open the Disk Management tool and click on your partition that is on your hard disk
- Click Delete Partition, this will delete the partition and you’ll lose all your data
- Your computer might restart at this point and you should open the Disk Management tool again
- This time instead of the partition, you will see Non allocated space
- Select this un-allocated space and choose Create a new partition
- Once this is done, you can either leave it as a new partition or merge it with some existing partition on your hard disk.
Solved – Move Windows 10 to SSD from HDD
Those were the steps for moving windows 10 to SSD from HDD. Once you are done with these, you can install software on your SSD that you use frequently and leave others on the hard disk. My desktop is a lot snappier now and it feels like it has got a new life. Earlier the boot times were easily above 10 seconds. But with the WD Green 240GB SSD, those times are around 5 seconds. The numbers might seem small, but trust me the speed difference is visible. The computer is a lot more faster and I love spending time on it. That was the tutorial post to move windows 10 to SSD from HDD. If there’s anything you feel is missing or need assistance, request you to mention in the comments below or tweet to me at @Atulmaharaj